

Imagine watching your grandmother's mahogany sideboard being lifted into a van just as a typical British drizzle starts to fall. It is the moment every homeowner dreads, seeing years of careful polishing and family memories at the mercy of a bumpy road and a few thin sheets. You aren't alone in this anxiety. Most people moving house in the UK worry about snapped table legs, moisture damage, or deep gouges in a favourite oak dining table. We understand that these pieces aren't just wood and glue; they are the heart of your home.
The good news is that you don't need a professional packing team to achieve a showroom-standard result. This guide will teach you exactly how to protect wooden furniture when moving by mastering the professional "Shield and Secure" layering technique. We'll show you how to use breathable textile layers and structural tension to ensure every piece arrives without a single scratch or split. You will learn which specific materials to buy, from heavy-duty removal blankets to webbing straps, and gain the confidence to load your van safely. From small bedside cabinets to heavy wardrobes, we have you covered for a damage-free move.
Key Takeaways
- Learn why cleaning your surfaces before packing is a vital step to prevent trapped dust particles from acting like sandpaper during transit.
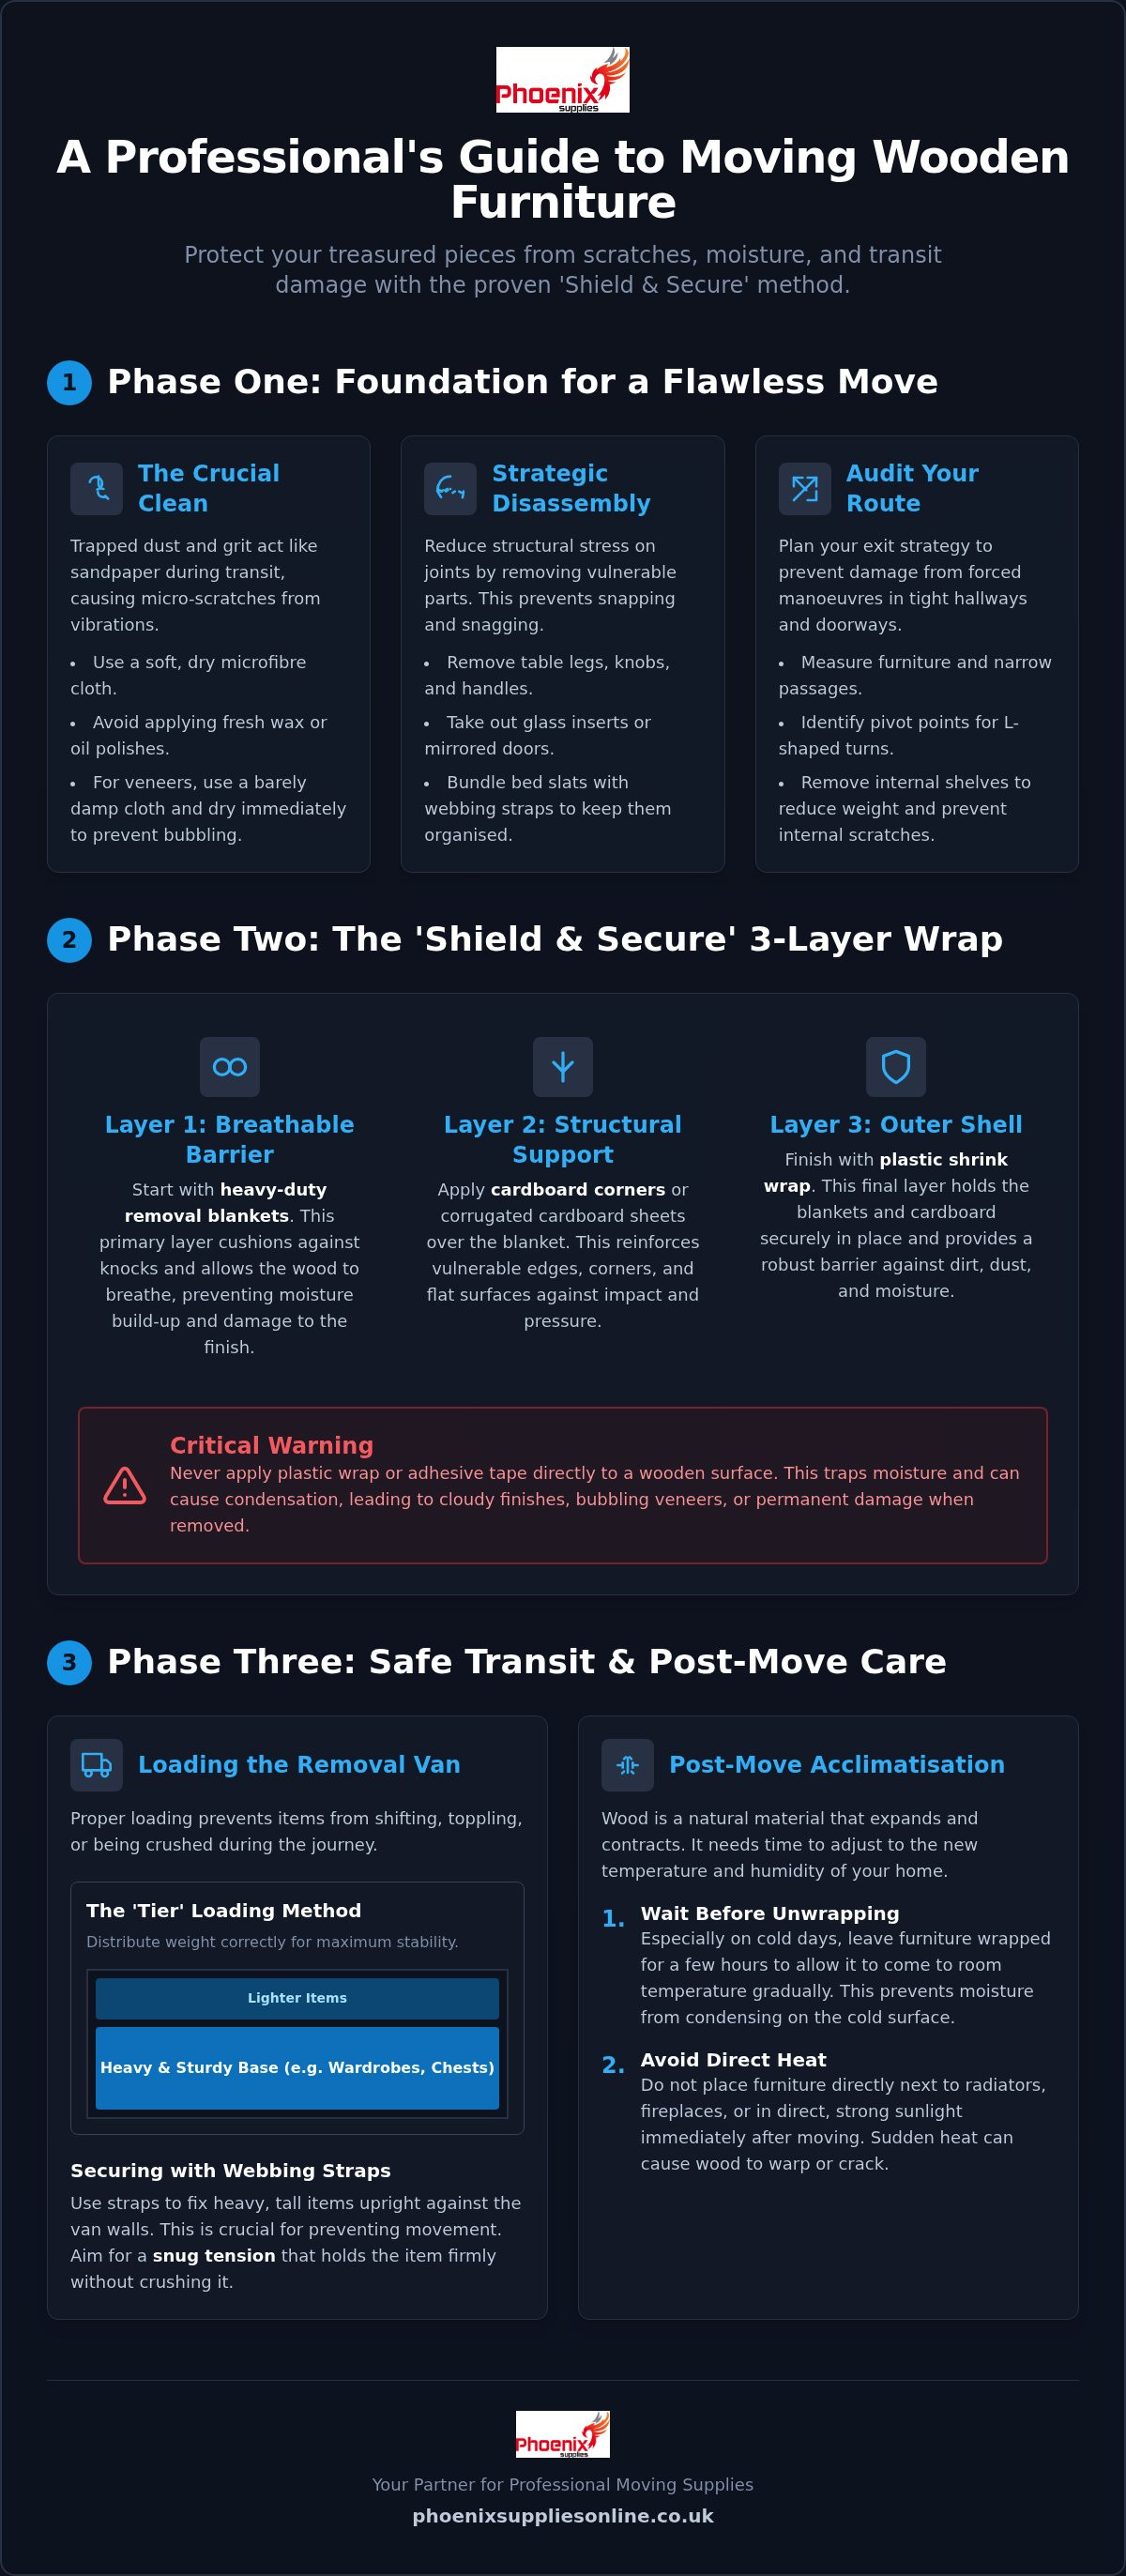
- Master the professional three-layer technique to understand exactly how to protect wooden furniture when moving without risking moisture damage or finish peeling.
- Discover why breathable removal blankets must always be used as the primary layer instead of applying plastic wrap or adhesive tape directly to the wood.
- Understand the physics of the "Tier" loading method and how to use webbing straps to keep heavy pieces secure and upright in the removal van.
- Find out how to safely acclimatise your furniture to its new home by managing humidity changes and avoiding immediate unwrapping on cold days.
Preparing Your Wooden Furniture for a Safe Move
Before a single blanket is unfolded or a strap is tightened, the work that happens in your living room is what determines whether your furniture arrives in perfect condition. The process of moving involves far more preparation than most people realise, and with wooden furniture specifically, the groundwork you lay before loading day is every bit as important as the packing itself.
The Crucial Cleaning Phase
Cleaning furniture before a move is the most overlooked step in knowing how to protect wooden furniture when moving, and skipping it is a surprisingly costly mistake. Here's the science: during transit, your van will vibrate continuously. Any dust, grit, or dried debris sitting on a surface gets pressed repeatedly against the finish by the weight of blankets or adjacent pieces. Those particles act as an abrasive, essentially sanding your wood with every bump in the road. A short stretch of motorway can produce hundreds of micro-vibrations.
The fix is straightforward. Use a soft, dry microfibre cloth to wipe down every surface, including the undersides of shelves and the backs of panels. Work methodically from top to bottom so loosened debris doesn't settle on areas you've already cleaned.
A word of caution on polishes: avoid applying heavy waxes or oil-based products immediately before moving. Fresh polish creates a tacky surface that causes protective materials to bond to the finish, which can lift it when removed. Dry surfaces are safe surfaces. If you spot any moisture, particularly on pieces stored near exterior walls, allow them to air dry fully before wrapping.
There's also an important distinction to make here that most guides miss: solid wood and veneered furniture behave differently. Solid wood is resilient to light surface cleaning, but veneered pieces have a thin decorative layer bonded to a substrate. Any trapped moisture beneath a veneer, even from a slightly damp cloth, can cause bubbling during transit. Always use a barely damp cloth on veneered surfaces, and dry immediately with a second cloth.
Measuring and Route Planning
A structural audit and route plan prevents the kind of panicked manoeuvring that snaps a chair leg in a narrow hallway. Before moving day, do the following:
- Measure the widest point of each piece, including handles and protruding mouldings, then compare it against your narrowest doorframe or corridor width.
- Identify pivot points in tight British hallways where an L-shaped turn requires tilting the piece. Knowing these in advance lets you plan whether a wardrobe needs to be taken apart first.
- Remove internal shelves before carrying any unit. Loose shelves rattle against the carcass during movement, causing internal scratches, and they add unnecessary weight that increases the risk of dropping the piece entirely.
- Check for weak joints or lifting veneers during your audit. A wobbly leg that's fine in a static room can shear completely under the lateral stress of being carried at an angle.
Ten minutes of planning here saves hours of regret later.
Disassembly and Hardware Organisation
Deciding whether to take a piece of furniture apart or move it whole is a balancing act. While it's tempting to save time by leaving everything intact, the lateral pressure inside a moving van can be unforgiving. Large items like wardrobes and dining tables are designed to bear weight vertically. When they're tilted or shifted during transit, the stress on joints and cam-locks can cause wood to split or screws to tear out of the grain. Learning how to protect wooden furniture when moving often starts with reducing these structural risks through strategic disassembly.
Removing Detachable Parts
The most vulnerable parts of any wooden item are the protrusions. Table legs act like long levers; a small knock at the foot puts massive pressure on the joint where it meets the tabletop. We always recommend removing legs from dining tables and desks whenever possible. This not only protects the joints but also makes the piece significantly easier to wrap and navigate through tight doorways.
You should also remove handles, knobs, and decorative finials. These small components frequently snag on removal blankets or doorframes, leading to snapped hardware or deep gouges in the wood finish. For beds, don't let the frame flex during the move. It's best to bundle bed slats together using webbing straps for moving to keep them organised and prevent them from rattling against the side rails. If your furniture includes glass inserts or mirrored doors, remove these entirely. Wood expands and contracts with temperature changes, and if a frame flexes even slightly, it can shatter the glass it holds.
Hardware Management
There is nothing more frustrating than arriving at a new home only to find a vital bolt has gone missing. We suggest using a "Bag and Tag" system for every item you dismantle. Place all screws, washers, and shelf pins into a clear, resealable plastic bag. Label the bag with a permanent marker, clearly stating which piece of furniture it belongs to.
Once the bag is sealed, tape it directly to a hidden area of the furniture, such as the underside of a tabletop or the inside of a carcass. We strongly advise using high-quality tape that leaves no residue, as standard packing tapes can bake onto the wood and ruin the finish. For larger components like shelf supports or brackets, you might find it easier to keep everything together by securing your items in a dedicated hardware box. This methodical approach ensures that when you're ready to rebuild, every single fixing is exactly where you expect it to be.
Mastering the Professional Layering Technique
Packing wood isn't just about hiding it from view; it's about creating a controlled environment. Many people make the mistake of wrapping a chest of drawers tightly in industrial plastic wrap to keep it dry. In the damp British climate, this is a recipe for disaster. Plastic traps moisture against the finish. If the temperature drops during transit, condensation forms under the plastic, leading to white "clouding" or permanent finish damage. Understanding how to protect wooden furniture when moving requires a more sophisticated, breathable approach.
Layer 1: The Breathable Textile Barrier
The first layer must always be textile-based. High-quality removal blankets are the gold standard here for a reason. These blankets are breathable, allowing the wood to adjust to humidity changes whilst providing a thick, soft cushion against surface abrasions. Drape the blankets over the entire surface area, ensuring they overlap significantly at the corners where damage is most likely to occur.
This textile layer should be the only material that comes into direct contact with your furniture's polished surfaces. It acts as a buffer, preventing the "sweating" that occurs with plastic and protecting the wood from the friction of the van's movement. For smaller items, you can use several blankets to ensure no part of the timber is left exposed to the elements or adjacent cargo.
Layer 2: Shock Absorption and Corner Protection
Once your breathable barrier is secure, you can add a secondary layer for shock absorption. This is particularly important for pieces with ornate carvings or delicate filigree. You can apply bubble wrap over the blankets in these high-risk areas. The air-filled bubbles provide a crumple zone that absorbs the energy of any accidental knocks during the carry.
Corners are the most frequent points of failure during a move. We recommend creating "edge armour" by folding thick strips of corrugated cardboard over the corners of tables, desks, and cabinets. This structural reinforcement prevents the wood from splitting if it's bumped against a doorframe. To finish the process, use stretch wrap or packing tape to secure the padding. The vital rule here is that the tape must only touch the blankets, the cardboard, or the bubble wrap. It should never touch the wood itself, as adhesive residues are notoriously difficult to remove without stripping the finish. By following this three-layer system, you create a professional-grade shield that handles the rigours of the road with ease.
Loading and Securing Furniture in the Removal Van
The moment you step onto the tail lift or ramp is where your preparation meets the reality of van physics. Even the most carefully wrapped mahogany table can suffer damage if it's allowed to shift during a sharp turn or sudden stop. Understanding how to protect wooden furniture when moving involves more than just padding; it requires a logical approach to how items are positioned and anchored inside the vehicle. A van in motion creates constant vibration and lateral forces that test every joint and surface of your furniture.
One rule we always emphasise is that your furniture should never sit directly on the van floor. Metal van floors are often cold, potentially damp, and usually hold traces of grit from previous loads. This grit can work its way under your protective blankets and scratch the feet or base of your pieces. Always lay a base layer of removal blankets or thick cardboard before placing any wooden item down. This simple step provides a final buffer against the road's vibrations and keeps your furniture clean.
Strategic Placement and Stacking
Professionals use the "Tier" method to load a van, building the load in vertical sections from the front to the back. Place heavy, stable items like wardrobes or large sideboards against the van bulkheads first. These pieces act as the foundation for the rest of your tier. When you're positioning these large items, ensure that any finished wooden surfaces are facing "soft" items like mattresses or upholstered sofas. This creates a natural cushion that prevents wood-on-wood rubbing.
Gaps are the enemy of a safe move. If there is space for an item to slide, it probably will. Use large moving boxes to fill the voids between furniture pieces. By wedging these boxes into gaps, you create a solid block of cargo that moves as one unit rather than individual pieces rattling against each other. This "tight pack" is the best way to prevent toppling during transit.
Securing with Webbing Straps
Once your furniture is in place, it must be anchored. Most removal vans are fitted with tie-rails along the interior walls. Anchor your large pieces to these rails using furniture straps for removal vans. Webbing straps distribute pressure more evenly than bungee cords, which are prone to snapping and can dig into delicate edges.
When tightening your straps, apply enough tension to stop all movement, but be careful not to over-tighten. Too much pressure can crush the wooden frame or leave permanent indentations in the finish, especially on softer woods like pine. If you're moving a particularly heavy item, use two straps at different heights to ensure it stays perfectly upright. To ensure your furniture stays exactly where you put it, you can order professional-grade webbing straps to add that essential layer of security to your move.
Unpacking and Post-Move Acclimatisation
The van has pulled up at your new doorstep, and the heavy lifting is nearly over. It's tempting to strip away the protective layers immediately to see how your favourite pieces look in their new surroundings. However, the final stage of knowing how to protect wooden furniture when moving happens once the items are safely inside. Wood is an organic, porous material that reacts sensitively to its environment. Moving a heavy oak table from a cold removal van into a centrally heated house causes a rapid shift in temperature and humidity that can damage the finish if handled poorly.
The Acclimatisation Process
On a typical British winter day, your furniture might have spent several hours in a van at temperatures below 10°C. If you unwrap it immediately in a room heated to 21°C, moisture from the warm indoor air will condense instantly on the cold wood surface. This often leads to a phenomenon known as "blooming", where white, cloudy marks appear under the wax or lacquer. These marks represent trapped moisture and are often difficult to remove without professional restoration. To prevent this, leave your blankets in place for 2 to 4 hours to allow for a gradual adjustment.
During this initial period, keep your furniture away from direct heat sources like radiators or fireplaces. Rapid heating causes wood to contract unevenly, which can lead to warping or the opening of small "shakes" or cracks in the grain. It's much safer to position your items in the centre of the room initially rather than tucking them into a corner next to a heat source. This patience ensures the wood fibres stabilises without the stress of sudden environmental changes.
Inspection and Reassembly
Once the furniture has reached room temperature, you can carefully remove the wrapping and conduct a thorough inspection. Check all joints, corners, and veneers for stress fractures or signs of lifting that might have occurred during the vibrations of the journey. If you find any issues, it’s best to document them immediately while the move is still fresh in your mind. This is also the time to ensure no moisture has been trapped against the wood during the transit period, especially if it was a rainy moving day.
When you are ready to put everything back together, refer to the hardware bags you organised during the packing phase. Reassembling with care is vital because old wooden furniture often has slightly worn threads in the pre-drilled holes. Take your time to align bolts by hand first to avoid cross-threading, which can permanently weaken the structural integrity of the piece. Finish the process with a final wipe using a dry microfibre cloth to remove any transit dust or fibres from the blankets. Your furniture is now ready to begin its next chapter in your new home.
Secure Your Furniture for the Journey Ahead
Moving house is a significant milestone, and your furniture should arrive at your new home looking exactly as it did when you left. By following the professional "Shield and Secure" method, you have mastered the essential steps of how to protect wooden furniture when moving. From the initial deep clean that prevents abrasive scratches to the vital acclimatisation period after you arrive, these small details make the difference between a successful move and a costly repair bill.
Remember to always prioritise breathable layers like removal blankets over direct plastic wrap to manage the British climate. Using heavy-duty webbing straps instead of bungees ensures your wardrobes and tables stay upright without crushing the wood. As a family-run UK business, we take pride in providing the same heavy-duty materials used by professional removal companies to help you move with confidence. We even offer free national delivery on all orders to make your preparation as smooth as possible.
Browse our professional-grade removal blankets and webbing straps to protect your furniture today. You have the plan and the right techniques; now you just need the professional tools to get the job done. We wish you every success with your move and a very happy first night in your new home.
Frequently Asked Questions
Can I put bubble wrap directly onto wooden furniture?
No, you shouldn't apply bubble wrap directly to polished timber. Plastic is non-breathable and can trap moisture against the finish, leading to permanent clouding or "blooming". Always place a removal blanket down as your primary layer. This creates a breathable barrier that protects the wood whilst allowing it to adjust to humidity changes. You can then safely add bubble wrap over the blanket for extra shock absorption.
How do I protect the corners of a heavy wooden dining table?
Protecting the corners of a heavy dining table requires structural reinforcement. After wrapping the table in blankets, fold thick sections of corrugated cardboard over each corner to create "edge armour". This absorbs the impact of knocks against doorframes. Secure the cardboard using stretch wrap, but ensure the plastic only touches the padding and never the wood itself. This is a vital part of learning how to protect wooden furniture when moving.
Is it better to use moving blankets or old bed sheets?
Professional removal blankets are significantly better than old bed sheets. While sheets offer basic dust protection, they are too thin to prevent scratches or absorb shocks. Removal blankets are made from heavy-duty, quilted material designed specifically to withstand the friction of a moving van. They provide a thick cushion that protects the timber's structural integrity and its delicate surface finish during the journey.
What happens if wooden furniture gets wet during a move?
If your furniture gets wet during a rainy UK moving day, you must dry it immediately with soft, lint-free cloths. Never wrap damp wood in plastic or blankets, as this traps moisture and causes the finish to bubble or the wood to warp. Allow the piece to air dry naturally in a well-ventilated room. Avoid placing it near a radiator, as rapid drying can cause the timber to split.
Should I empty drawers before moving a chest of drawers?
You should always empty drawers before moving a chest of drawers. Leaving items inside adds unnecessary weight that puts extra stress on the joints and drawer runners during the carry. Loose items can also rattle around, causing internal scratches or even punching through the back panel. Once empty, you can secure the drawers using a removal blanket and stretch wrap to keep them from sliding open.
How do I stop my furniture from sliding around in the van?
The best way to stop furniture from sliding is to use a combination of webbing straps and a "tight pack" strategy. Anchor heavy pieces to the van's tie-rails using professional-grade straps to prevent toppling. For smaller gaps, wedge large moving boxes or bags of soft items between the furniture. This creates a solid block of cargo that resists the lateral forces created by the van's movement.
What is the best way to move a heavy solid oak wardrobe?
Moving a heavy solid oak wardrobe usually requires removing the doors and internal shelves to reduce weight. If the piece is too large for doorways, check if it can be safely dismantled into smaller sections. Use a furniture dolly for the heavy carcass and always have at least two people to manage the weight. This methodical approach is the safest way to ensure you know how to protect wooden furniture when moving.
Does tape damage the finish on antique wooden furniture?
Adhesive tape can cause significant damage to the finish on antique furniture. The chemicals in the glue can react with old wax or French polish, stripping the surface when the tape is removed. Even "low-tack" tapes can leave a sticky residue that is difficult to clean. Always ensure that tape only makes contact with your protective blankets or bubble wrap, keeping the antique finish completely untouched.


