

To learn how to pack pictures and mirrors for moving, wrap each item separately, cushion it in a snug box and keep it upright in the vehicle. Mark every side of the package “Fragile” and “This way up”, and don’t stack anything on top. These steps help protect the glass and frame while making the package’s orientation clear during the move.
It’s easy to focus on wrapping and overlook labels, but clear markings help everyone handle picture boxes carefully. This guide covers the packing materials to gather, ways to protect glass and frame corners, and how to wrap and box pictures safely. You’ll also learn how to fill gaps, separate heavier frames from lighter ones, and label packages so their contents and orientation are clear at a glance.
Key Takeaways
- Gather suitable wrapping, sturdy cartons and corner padding before you start, and consider foam pipe lagging to cushion vulnerable frame edges.
- Give mirror glass extra protection with layered padding, then secure the wrapped item so it cannot shift inside its box.
- Mark every side of each package “Fragile” and “This way up” to make careful handling and correct orientation clear.
- Choose a box that fits the item and packing materials without leaving it loose; Phoenix Supplies UK offers moving boxes in several sizes.
What Do I Need for Packing Pictures and Mirrors?
Gather wrapping materials, a suitable box and padding before handling framed pictures or mirrors. Set aside separate materials to protect the glass, frame edges and artwork surfaces.
UK removals insurance does not automatically cover accidental damage to pictures and mirrors. Some policies exclude items packed by the owner, so read the policy terms and packing requirements before moving day.
-
Gather materials for framed items
Collect packing paper, bubble wrap, flat cardboard, packing tape and a snug picture box. Cardboard or foam corner protectors help shield frame edges from knocks. Use low-tack tape on glazed picture glass, not directly on the frame. The UK Government advises protecting glass with low-tack tape. Avoid applying tape to acrylic glazing or an unglazed painting. Clean hands or cotton gloves help keep dust and oils off the glass.
-
Protect frame edges with foam
Fit foam pipe lagging or a pool noodle around each frame edge to cushion the corners. Cut the foam to match the sides, then check that it sits securely without pressing on the glass or artwork. For a homemade option, cut a 4 or 5-inch cardboard or foam square into corner protectors. Keep heavier frames separate from lightweight ones so they can’t crush them. Don’t use tape directly on the frame’s finish.
-
Prepare framed and rolled canvas artwork
Wrap framed artwork individually and keep each piece upright in the moving vehicle, rather than laying it flat. Place large frames against the van’s side and secure them with straps to prevent sliding or falling. Keep heavy loads away from picture packages, and don’t stack anything on top. For flat canvas artwork that isn’t on a wooden frame, place the painted side down on acid-free paper, roll it loosely and use a cardboard tube. Keep tape away from unglazed surfaces.
Packing mirrors with extra surface protection
Protect mirror glass with two layers of bubble wrap, then add a rigid cardboard cover. Newspaper, bubble wrap and tape can mark artwork or leave residue if they touch delicate surfaces directly, so place a clean protective layer between them.
-
Choose packing supplies for pictures and mirrors
Gather packing paper, bubble wrap, cardboard sheets, corner padding and strong packing tape. For a mirror, cover the reflective surface with two layers of bubble wrap, keeping tape on the outer wrapping rather than the glass. Slide cardboard over the front and back to help protect it from pressure. For artwork, use acid-free tissue or glassine against unglazed surfaces to help prevent wrapping from sticking.
Use bubble wrap for packing to add cushioning around the protected surface.
-
Use mirror boxes and packing kits
Choose a picture or mirror box that fits closely around the wrapped item. Telescopic cartons adjust to different frame sizes; check that the box holds the mirror securely once padded. Tape the bottom firmly, add cushioning, then centre the mirror inside. Fill gaps with packing paper or soft material so the item cannot shift. Don’t leave empty space around the edges.
-
Consider risks from wrapping materials
Keep newspaper ink away from artwork because it can transfer onto the surface. Bubble wrap can leave impressions on delicate finishes, particularly if pressed directly against them, so place clean paper between the wrap and artwork. Avoid sticking tape to a painting, frame or mirror glass. For an extra-large or unusually shaped mirror, make a custom-sized box from a regular packing carton, then check that every edge is cushioned before sealing.
Labelling fragile packages and marking orientation
Clear labels tell handlers what each box contains and how to carry it. Mark picture and mirror boxes “Fragile” and “This way up” on every side.
-
Label packages as fragile
Write “Fragile” in large, clear letters on every side of each picture or mirror box. The warning will remain visible when boxes are turned or placed together during transport. Use a permanent marker, keeping the wording clear of seams, tape and handles. Add a short contents note, such as “hall mirror” or “framed landscape”, so you can identify the item without opening the carton.
Give each package its own number, then list that number beside its contents. For example, record “Box 1, hallway mirror” in your moving inventory. Numbering helps you account for each item when unloading and unpacking, especially if several boxes look alike. Don’t rely on “Fragile” alone to explain which way the contents should face.
-
Mark package orientation
Write “This way up” on every side, and add clear arrows pointing towards the top. Check the arrow direction after sealing the box, as it’s easy to turn a carton while taping. Keep framed pictures and mirrors upright during transport, not flat. Don’t stack other items on top of their packages.
Make the top and bottom easy to distinguish. Place the main label away from the box opening so tape doesn’t cover it. If you’re carrying several framed items, keep each label facing outwards when loading. This lets the handler see the box’s orientation without turning it around.
- Before loading, compare each package with your numbered contents list. Check that “Fragile” and “This way up” remain legible on every side. Set picture boxes upright, secure them so they can’t slide, and leave their tops clear. For a long journey, check at a stop that the frames haven’t worked loose. Recheck labels before unloading, particularly if boxes have shifted during transport.
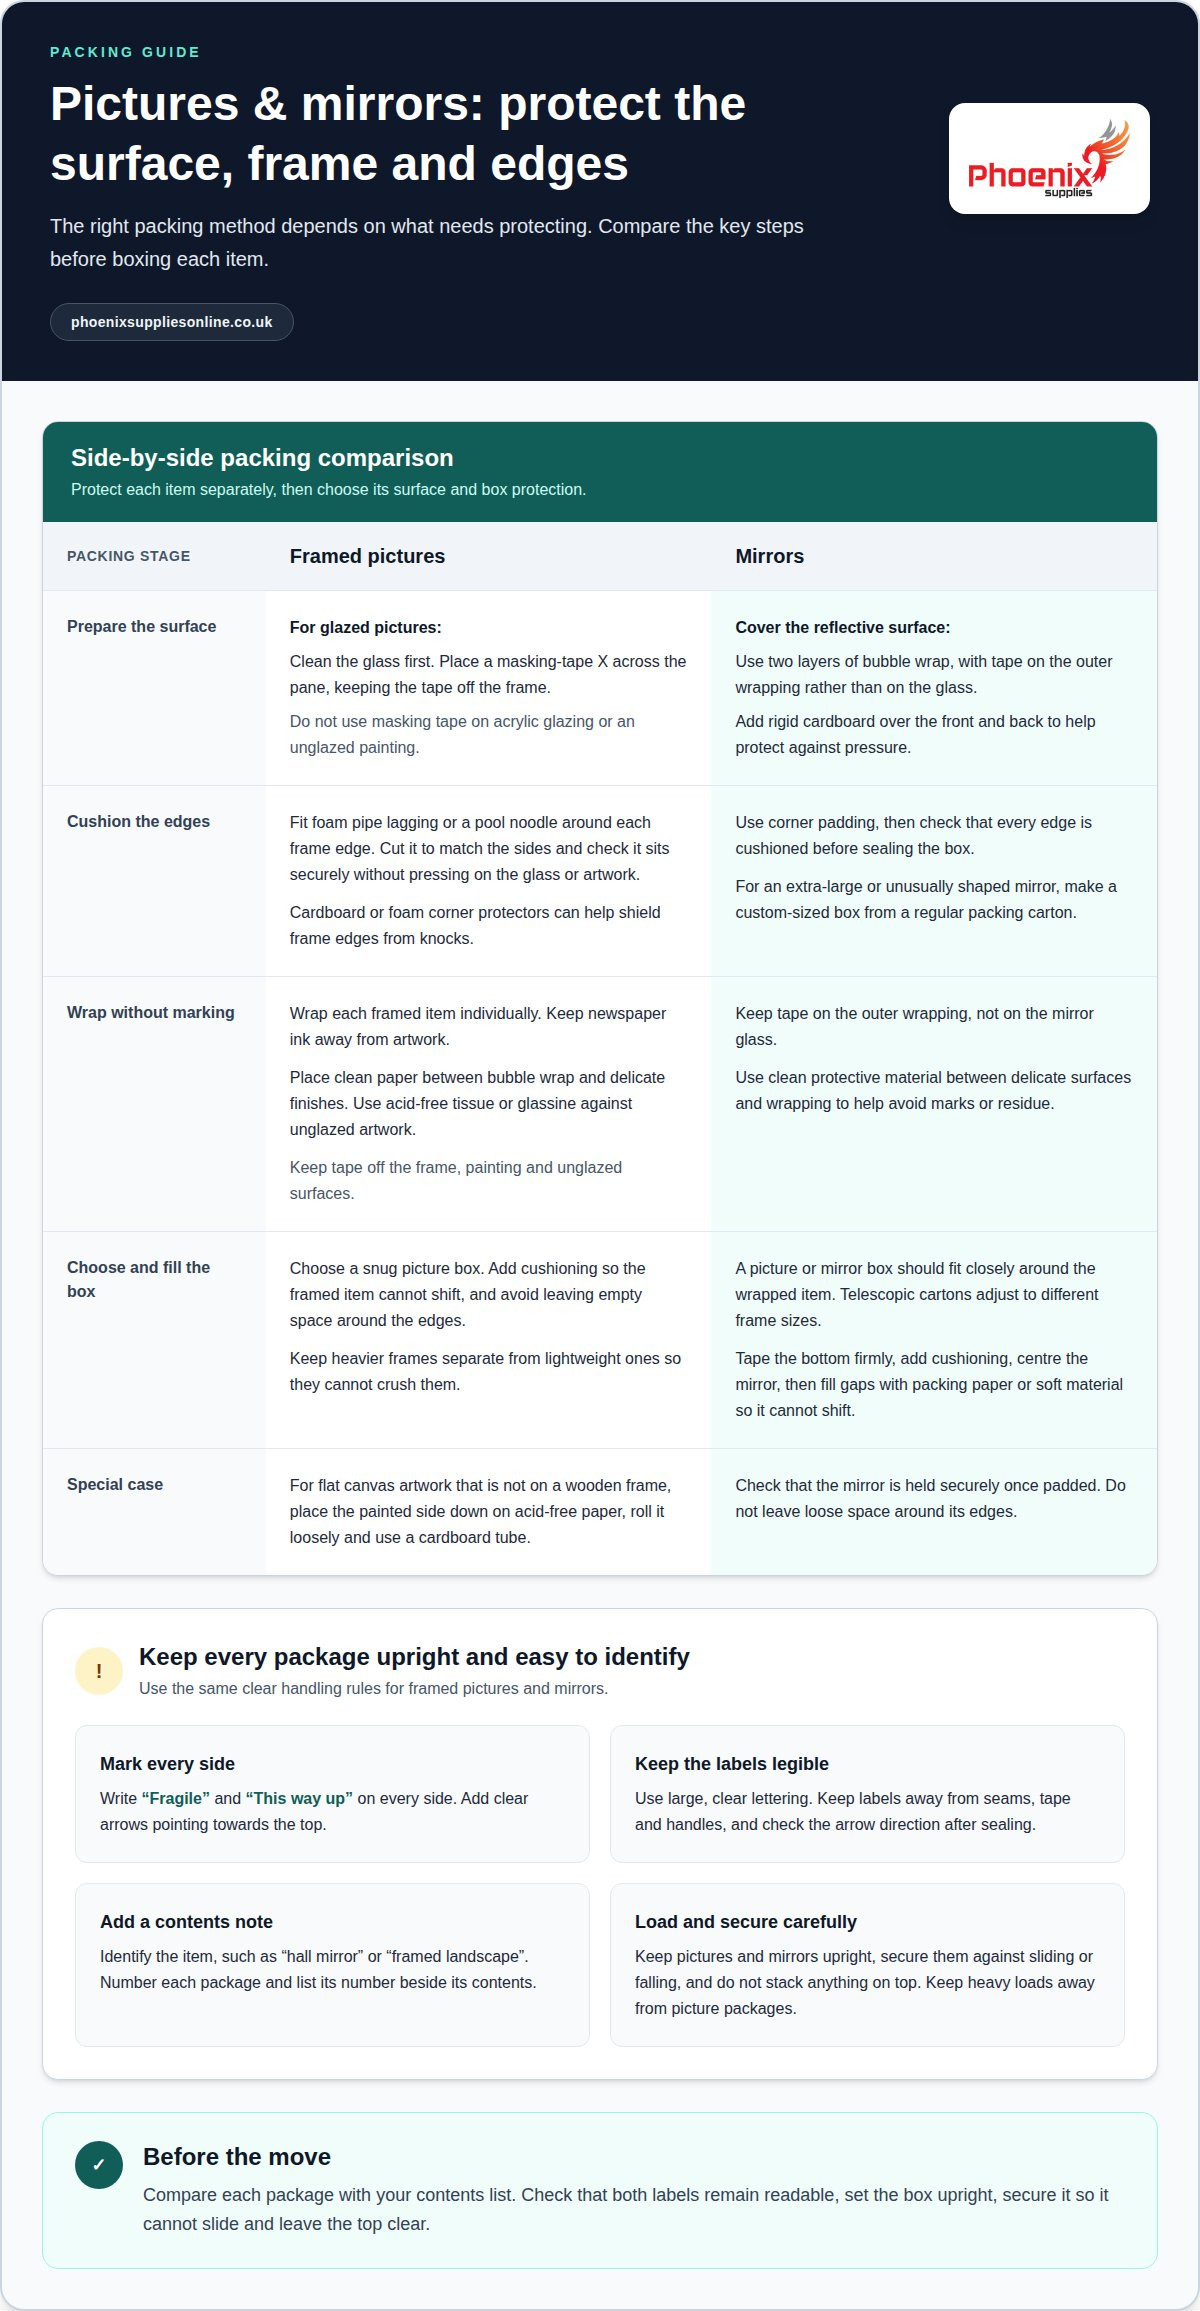
What is the step-by-step way to wrap and pack framed pictures and mirrors?
Follow these steps in order so each framed item is protected before it goes into its box.
- Clean glazed glass before packing. Dust and grit can scratch the surface during wrapping. For framed pictures with glass, place a masking-tape X across the pane, keeping tape off the frame. Don’t use masking tape on acrylic glazing or an unglazed painting.
- Lay two or three sheets of packing paper over the frame, adding more if needed. Fold the paper neatly around each edge and secure it with tape on the paper only. Never stick tape directly to the frame, as it may mark the finish.
- Cut a piece of cardboard to cover the front of the picture. Place it over the paper-wrapped frame before adding the outer cushioning. This firm layer helps shield the glass from contact with other packages and reduces pressure on the front.
- Wrap each picture frame at least twice in bubble wrap or a furniture blanket. For a mirror, first add two layers over the reflective surface, then wrap the whole item. Secure the outer wrapping without letting adhesive touch the glass, artwork or frame.
- Choose a box about 10 cm larger than the item on every side. Tape the bottom securely, then place a couple of sheets of packing paper inside. Stand the wrapped item in the box and fill gaps with soft material or scrunched packing paper.
- Pack framed items upright, with heavier frames separate from lighter ones. Keep each box at or below 20 kg, and don’t stack anything on top. Before sealing, gently check that the contents can’t shift; add cushioning wherever you feel movement.
Gather the right materials for each stage with packing supplies for moving.
Phoenix Supplies UK: Small Moving Boxes
Phoenix Supplies UK offers Small Moving Boxes for smaller items alongside your protected pictures and mirrors. Medium Moving Boxes and Large Moving Boxes suit other household belongings, while Extra Large TV Moving Boxes are intended for larger screens. Compare the box dimensions with the item and the cushioning you plan to add, so everything fits securely without being forced inside.
When moving several rooms, grouping belongings by box size can make packing and loading easier to organise. Whatever sizes you choose, keep fragile picture packages upright and separate from heavier boxes.
Visit the Phoenix Supplies UK website to browse its range of moving boxes.
Make your moving-day plan now
Set aside a safe place for framed items before packing, then plan where each box will sit during transport. A little preparation helps keep picture packages upright and away from heavier belongings. If you’re still organising supplies, Phoenix Supplies UK offers Small Moving Boxes, Medium Moving Boxes and Large Moving Boxes for different household items.
Use what you’ve learnt about how to pack pictures and mirrors for moving to prepare your materials and make a simple room-by-room packing plan. Choose box sizes to suit the contents, leaving enough space for protective cushioning.
Ask Phoenix Supplies UK for packing advice as you get ready for moving day. With your supplies organised and each item carefully prepared, you can move on to the next task with confidence.
Frequently Asked Questions
Need more packing advice?
Yes. For help choosing packaging for your move, contact Phoenix Supplies UK. Before getting in touch, note how many framed items you have, their approximate dimensions, and whether each has glass, acrylic or canvas. Also mention which materials you’ve gathered. These details help the team understand your packing needs and discuss suitable supplies.
What packing materials do I need to pack pictures and mirrors for moving?
Knowing how to pack pictures and mirrors for moving starts with matching materials to each item’s surface and shape. For a glazed frame, prepare a clean work area, protective paper, cushioning, a suitably sized carton and marker pens for your inventory. Keep acid-free tissue or glassine ready for unglazed artwork. Separate the materials before you begin, so adhesive and rough wrapping stay away from delicate surfaces.
How do I protect glass pictures and mirrors with masking tape or corner protectors?
Use low-tack tape only on suitable glazed glass, keeping it clear of the frame and surrounding finish. For acrylic glazing and unglazed artwork, use a different protective approach rather than applying tape directly. Add a protector to each frame corner, checking that it covers the edge without pressing against the glass. Tape and corner padding provide separate forms of protection for different parts of the item.
How should I pack large mirrors and oversized framed artwork for a move?
Measure the item and its route through doorways, hallways and stairwells before wrapping it. This helps you spot access problems while the mirror is still easy to reposition. For an oversized piece, form a protective carton around its shape, then check that no edge projects through the packaging. Plan how it will sit in the vehicle before loading, so you don’t have to turn it in a tight space.
How do I pack pictures with glass, canvas paintings and unframed artwork differently?
Choose your packing method by checking whether the artwork has glazing, a stretched canvas frame or no frame. Glass pictures need protection over the pane, while unglazed surfaces need clean, non-sticking layers. Keep a stretched canvas on its frame rather than treating it like a loose sheet. Flat, unframed canvas can be rolled loosely with acid-free paper, then placed in a tube for transport.
What size boxes or picture cartons should I use for mirrors and framed pictures?
Measure the frame’s width and height, then allow for the space taken up by protective layers when choosing a carton. Compare those measurements with the box’s usable internal dimensions, not its outside size. The item should fit without force, and the remaining space must be filled so it can’t shift. Adjustable picture cartons can accommodate different frame sizes, provided the fit remains secure.


