

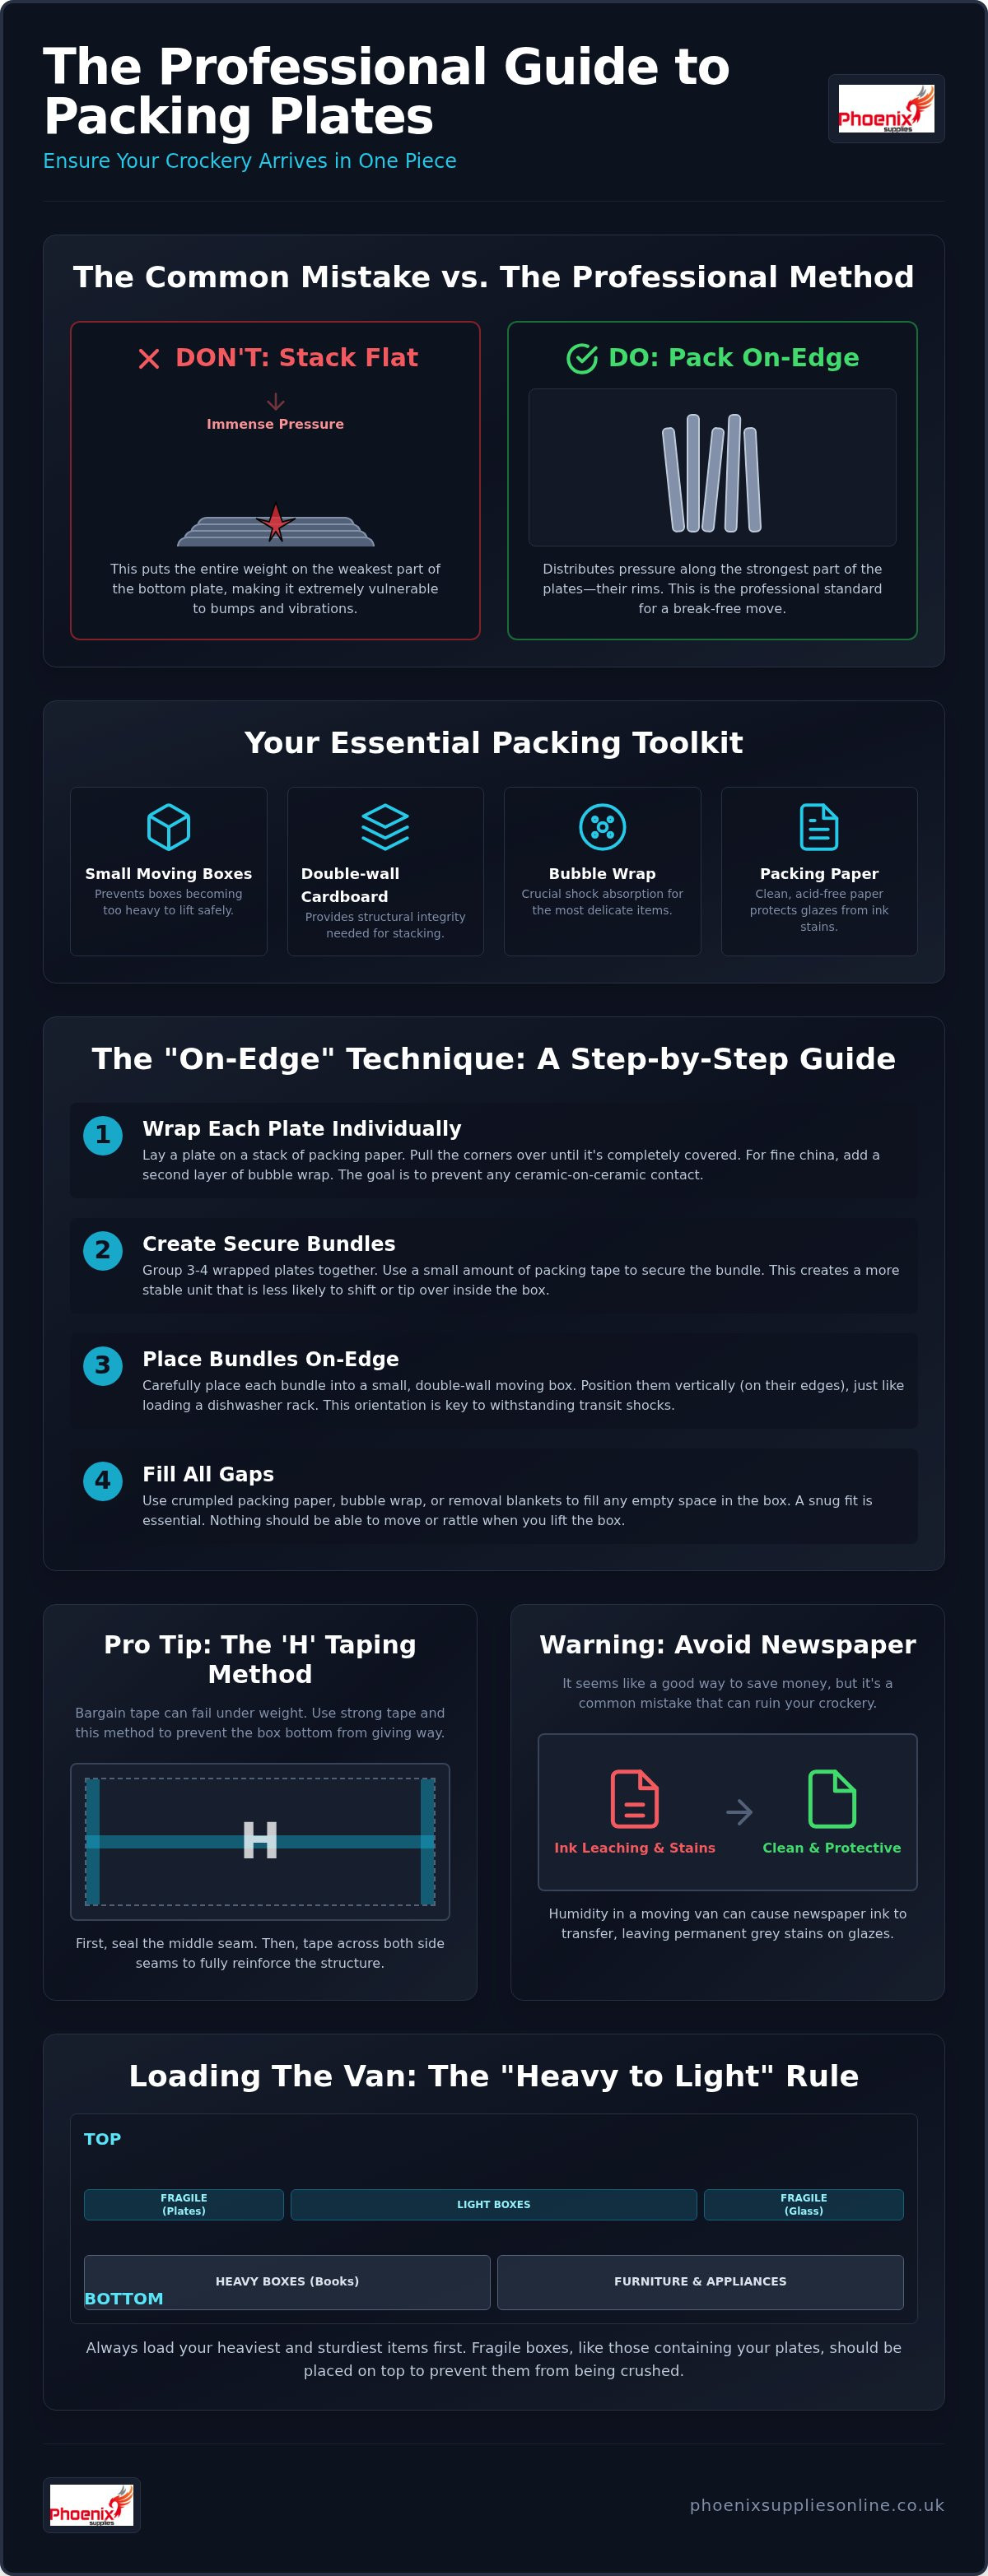
Most people assume that stacking plates like pancakes is the sturdiest way to transport them, but this common habit is actually the primary cause of transit breakage. When you stack crockery flat, the weight of the pile puts immense pressure on the bottom plate, making it vulnerable to every bump in the road. Learning how to pack plates for moving correctly starts with a simple shift in perspective: you should always pack them on their edges, just like a dishwasher rack.
We know the sinking feeling of opening a moving box only to find a shattered heirloom or a chipped dinner set. It's a stressful experience that often comes from using the wrong materials or over-packing heavy boxes until they become a physical strain. This guide is designed to replace that worry with confidence. You'll master the professional "on-edge" technique and discover why small, double-wall boxes are your best ally for a damage-free transition.
We'll cover everything from the best ways to use bubble wrap and packing paper to efficient space-saving tips that keep your kitchenware secure. By the time you finish reading, you'll have a clear, step-by-step plan to ensure your favourite plates arrive at your new home in one piece.
Key Takeaways
- Learn why the professional "on-edge" technique is the only way to prevent transit breakage and protect your precious crockery.
- Discover how to pack plates for moving using Small Moving Boxes and double-wall cardboard to ensure your parcels are manageable and secure.
- Identify the essential protective layers, from shock-absorbing bubble wrap to removal blankets, that keep vibration from reaching your items.
- Master the "heavy to light" rule for loading a van to keep your fragile boxes safe from being crushed during the journey.
Essential Packing Materials: What You Need Before You Start
Before you dive into the specifics of how to pack plates for moving, you need to gather the right kit. Using the correct materials isn't just about convenience; it's about creating a protective environment that absorbs the vibrations and bumps of the journey. High-quality supplies act as insurance for your kitchenware, ensuring your favourite dinner set arrives without a single chip.
We recommend starting with a dedicated selection of tools. You'll need:
- Small Moving Boxes: These are the only safe choice for heavy crockery. Larger boxes often become too heavy to lift safely or, worse, the bottom can give way.
- Double-wall cardboard: This provides the structural integrity needed to stack boxes without the lower ones collapsing.
- High-quality bubble wrap: Use this for shock absorption around the most delicate pieces.
- Removal blankets: These are perfect for lining the base of the box or filling large gaps to prevent movement.
The Problem with Newspaper Ink
It's tempting to use old newspapers to save money, but this is a common mistake that can ruin expensive porcelain. During a move, moisture levels in the back of a van can fluctuate. This humidity causes newspaper ink to leach, often leaving permanent grey stains on your plate glazes that are nearly impossible to scrub off. Buying clean, professional packing paper is a small investment that protects your set from unsightly marks.
Acid-free packing paper is the gold standard for fine china because it prevents chemical reactions that can dull or damage delicate glazes over time.
Choosing the Right Tape and Labelling
The security of your box depends entirely on the quality of your tape. "Bargain" rolls often lack the adhesive strength to hold heavy loads, leading to the dreaded "bottoming out" where the contents fall through the base. To prevent this, you must tape the bottom of every box in a "H" pattern. This involves sealing the middle seam and then taping across both side seams to reinforce the structure.
Once the box is sealed, use a thick-nibbed marker pen to label it clearly. Write "FRAGILE" and "KITCHEN PLATES" on at least two sides so the person carrying it knows exactly what's inside. For a complete list of everything you'll need, take a look at The Ultimate Packing Materials List for Moving House in 2026 to help you get organised.
How to Pack Plates for Moving: The "On-Edge" Technique
Understanding the physics of your crockery is the secret to a break-free move. Most of us naturally want to stack plates flat, but this is exactly how they get damaged. A plate’s centre is its most fragile point, whilst the rim is designed for structural strength. When you stack them horizontally, the bottom plate bears the entire weight of the pile on its weakest spot. By turning them on their side, you ensure the pressure is distributed through the reinforced edges.
Step-by-Step Wrapping Guide
To master how to pack plates for moving, you must create a "paper cushion" for every item. Lay a stack of clean packing paper on a flat surface. Place a single plate in the centre and pull the corners of the top sheet over the rim until the ceramic is completely covered. If you're handling heirloom china or particularly delicate pieces, add a secondary layer of high-quality bubble wrap for extra shock absorption. It's vital that no ceramic-to-ceramic contact is possible, as even small vibrations can cause chips during transit.
Bundling for Extra Security
Once you've wrapped individual plates, group them into bundles of three or four. Use a small amount of packing tape to secure these bundles together. This creates a larger, more stable unit that is much harder to tip over or rattle inside the box. It also makes the loading process faster and more organised. A snug fit is better than a tight squeeze; you want the plates to stay together without putting unnecessary tension on the paper layers.
Finally, place these bundles into your Small Moving Box vertically. Think of it like loading a dishwasher rack. This vertical orientation allows the plates to withstand the vertical shocks of a moving van much more effectively than a flat stack ever could. Fill any remaining gaps with crumpled paper or a removal blanket to ensure nothing shifts when the box is lifted.
Box Selection: Why Small Heavy-Duty Boxes are Essential
Selecting the right container is just as vital as the wrapping itself. Many people fall into the "weight trap" by using large boxes for their kitchenware. While it might seem efficient to put the whole cupboard into one box, the result is often a container that's dangerously heavy and prone to "bottoming out". For anyone learning how to pack plates for moving, the industry standard is to use Small Moving Boxes. These smaller dimensions naturally limit the weight, making the load manageable for one person and reducing the risk of the cardboard tearing under pressure. A single box of dinner plates can easily weigh 15 to 20kg, which is the upper limit for safe, manual handling during a move.
The Strength of Double-Wall Cardboard
Double-wall boxes are a necessity because they feature two layers of corrugated fluting. This fluting is the wavy layer of cardboard between the flat liners that provides vertical strength. This design provides the crush resistance needed when boxes are stacked several layers high in a removal van. Single-wall options are fine for light linens, but they often buckle under the weight of stoneware or porcelain. These are the same heavy-duty containers we recommend in our guide on Small Moving Boxes for Books: A Guide to Packing Your Library Safely, as both books and plates require maximum structural support to prevent the box from losing its shape during transit.
Reinforcing the Base
Before you place a single bundle inside, you must reinforce the base. Use the "Double-T" taping method: tape the centre seam, then apply two perpendicular strips across the bottom. This distributes the weight across the tape's adhesive rather than just the cardboard flaps. Inside the box, create a 2-inch "crumple zone" by lining the bottom with plenty of tightly balled-up packing paper. This layer acts as a shock absorber against vibrations from the road. It also ensures that the plates never touch the hard base of the box directly. Always lift the box slightly before sealing it. If you can't lift it comfortably with both hands while maintaining a straight back, it's too heavy. It's always better to use three small boxes than one large one that causes a physical injury or a broken dinner set.
Packing Bowls, Saucers, and Delicate Fine China
While mastering how to pack plates for moving is the foundation of a safe kitchen pack, your bowls and saucers require a tailored approach. These items often have different structural vulnerabilities compared to flat dinner plates. Saucers, for instance, should always be treated like mini-plates. Wrap them individually and stack them on their edges in the same vertical fashion as your main dinner set. This ensures the pressure stays on the rims rather than the centre, which is much safer for the ceramic.
Nesting Bowls Safely
Nesting is a great way to save space, but it's also a common cause of pressure cracks. When you stack bowls directly inside one another, the weight of the upper bowls concentrates on the base of the bottom one. To prevent this, place a generous layer of shock-absorbing bubble wrap or several sheets of crumpled paper between every single item. We recommend nesting no more than three bowls together in a single stack. Once they're in the box, give the side a gentle tap. If you hear the "clink" of ceramic meeting ceramic, you need more padding. You can find high-quality bubble wrap and packing supplies to help create these essential protective barriers.
Protecting Fine and Antique China
Hand-painted or gold-rimmed china needs even more care than your everyday stoneware. The glazes on antique pieces can be surprisingly reactive. Never use plastic wrap or cling film directly against these surfaces; the adhesive properties can actually pull away delicate gold leaf or paint when you unpack. Instead, use acid-free tissue paper as your first layer of protection. For extremely high-value heirlooms, consider the "double-box" method. This involves placing the wrapped items into a small box, then placing that box inside a larger one with at least two inches of padding on all sides. This creates a secondary crumple zone that protects the most fragile pieces from external impacts.
Finally, remember to fill the "voids". Gaps in a box allow items to shift and collide during transit. Use soft household items like tea towels, clean socks, or oven mitts to plug any small holes. This not only saves on packing material but also provides a secondary internal cushion that keeps everything stationary. A well-packed box should feel like a solid unit when you lift it, with no movement felt or heard from the contents inside. This methodical approach ensures that even your most delicate pieces survive the journey to your new home.
Loading the Removal Van: Securing Your Fragile Boxes
Once you've mastered how to pack plates for moving, the final challenge is the journey itself. The back of a removal van is a turbulent environment where vibration and sudden shifts can undo all your hard work. To keep your crockery safe, you must follow the "heavy to light" rule of van stacking. This means placing your heaviest, most solid items like appliances and wardrobes on the floor first. However, plate boxes are a special case; they're heavy due to the ceramic but fragile in nature. You should never place them at the very bottom of a tall stack where the combined weight of other boxes might crush them over time.
One of the best ways to protect these boxes is by using removal blankets as a secondary layer of insulation. Before you load your kitchen boxes, lay a folded removal blanket on the van floor. This creates a soft, shock-absorbing base that dampens the vibrations from the road. It's a simple step that many people overlook, but it's incredibly effective at preventing the micro-cracks that occur when boxes sit directly on a hard wooden or metal floor. You can also drape blankets over the boxes once they're in place to prevent other items from scratching the cardboard.
Positioning for Stability
Where you place your boxes in the van matters just as much as how they're stacked. Avoid placing fragile items directly over the van's axle, as this is the most turbulent part of the vehicle and experiences the most bounce. Instead, try to wedge your plate boxes between heavy, stationary furniture items like a sofa and a chest of drawers. This "nesting" prevents the boxes from sliding during transit. Ensure that the "This Way Up" arrows you marked earlier are clearly visible and followed by everyone helping with the move. If a box is turned on its side, the "on-edge" packing technique you used becomes ineffective, leaving the plates vulnerable to pressure.
The Finishing Touches
Before you close the van doors, perform one final check. Give each box a very gentle shake; if you hear even the slightest rattle, add more packing paper to fill the void. To keep everything stationary, use webbing straps to pin your kitchen boxes securely against the van wall. These straps are designed to hold heavy loads in place, ensuring that a sudden brake doesn't send your dinner set sliding across the floor. If you're ready to start your journey, browse our range of heavy-duty small moving boxes to find the perfect protection for your home.
Ready for a Break-Free Move?
Moving house is a significant task, but your kitchenware doesn't have to be a source of stress. By adopting the professional "on-edge" technique, you've already taken the most important step in protecting your crockery. This simple shift, combined with the use of clean packing paper and shock-absorbing bubble wrap, ensures your dinner sets are cushioned against the inevitable vibrations of the road. It's about working with the natural strength of the ceramic rather than against it.
The final piece of the puzzle is choosing the right containers. High-quality double-wall cardboard is essential for providing the structural integrity needed to stack boxes safely without them buckling. As a family-run UK business, we're dedicated to helping you achieve a damage-free transition with reliable materials and personalised support. Now that you've mastered how to pack plates for moving, you can approach your moving day with complete confidence and peace of mind.
To get started with the best supplies for the job, order your Heavy Duty Small Moving Boxes from Phoenix Supplies UK today. We offer nationwide delivery on all our packing supplies, ensuring you have everything you need to protect your belongings from start to finish. Good luck with your move!
Frequently Asked Questions
Can I pack plates without professional packing paper?
You can use household items like towels or linens, but we strongly advise against using old newspapers. The moisture levels during transit often cause newspaper ink to leach, leaving permanent grey stains on your plate glazes. Professional packing paper is clean, ink-free, and specifically designed to provide a thick cushion. For high-value or antique sets, acid-free paper is the safest choice to prevent chemical damage over long periods.
How many plates should I put in one moving box?
Weight is a better guide than the number of items. A Small Moving Box shouldn't exceed 15 to 20kg to ensure it stays manageable and the bottom doesn't give way. Typically, this allows for about 10 to 12 large dinner plates wrapped in bundles, with space for smaller side plates or saucers on top. Always lift the box to check the weight before you seal the final flaps.
Is bubble wrap better than paper for packing plates?
Both materials serve different purposes in the packing process. Packing paper is excellent for creating a thick, multi-layered cushion around every item and is more cost-effective for everyday sets. Bubble wrap provides superior shock absorption for heirloom china or glass. When learning how to pack plates for moving, a combination works best: use paper for individual wrapping and bubble wrap as a secondary layer for your most delicate pieces.
What happens if I pack my plates flat instead of on their side?
Packing plates flat is the most common cause of breakage during a move. When stacked horizontally, the weight of the entire pile is concentrated on the centre of the bottom plate, which is its weakest point. Any vibration or bump in the road can cause that pressure to snap the ceramic. By packing them on their edges, you utilise the structural strength of the rims to distribute weight evenly.
How do I stop my plates from rattling inside the box?
Eliminating "the rattle" is essential for a safe journey. Once your plates are positioned vertically, fill every remaining gap with tightly crumpled packing paper, tea towels, or bubble wrap. The goal is to ensure the contents cannot shift when the box is tilted or moved. Perform a gentle shake test before sealing the box. If you hear or feel any movement, add more padding until the internal load feels solid.
Should I use large boxes to save money on the move?
Using large boxes for heavy ceramics is a false economy that often leads to broken items and back strain. Large boxes quickly become too heavy to lift safely, and the sheer weight of plates can cause the cardboard to buckle or the bottom to fall out. Small Moving Boxes are the industry standard for a reason. They keep the weight manageable and are much easier to stack securely in the removal van.
What is the best way to tape a box full of heavy crockery?
Use the "H-tape" or "Double-T" method to reinforce the base of your box. Start by sealing the middle seam, then apply two perpendicular strips across the side seams to create a strong support structure. This ensures the weight of the plates is distributed across the adhesive rather than just the cardboard flaps. Always use high-quality packing tape; cheaper rolls often lack the strength to hold heavy loads during a long journey.
How do I pack deep soup bowls differently from flat plates?
Deep soup bowls require a "nesting" technique rather than the vertical method used for plates. Wrap each bowl individually in packing paper, then nest them together with a layer of bubble wrap or crumpled paper between every item. Limit your stacks to no more than three bowls to prevent pressure cracks at the bottom of the pile. Place these nested stacks in the box with plenty of padding surrounding them.


