

A bigger box isn’t always safer for a picture frame. Too much space lets it slide around, putting the glass and corners at risk while it’s being carried. A DIY picture frame moving box can give you a closer fit, using cardboard and protective padding to help keep the frame steady.
Start by measuring the frame, then allow space for cushioning. The finished enclosure should hold the frame securely without squeezing it. With careful measuring and a few checks before sealing, you can make a simple box from cardboard and reduce movement during your move.
This guide explains how to measure your frame, plan and assemble the cardboard, and protect the glass and corners. You’ll also learn how to label and position the finished box, and what to consider if your frame is particularly fragile or valuable.
Key Takeaways
- A DIY picture frame moving box can be shaped around your frame to help limit movement in transit.
- Choose cardboard and padding to suit the frame’s size, weight and condition.
- Compare a homemade enclosure with a suitable standard box, considering fit, padding and how securely each closes.
- Use your measurements to mark, fold and assemble the cardboard into protective faces and sides.
- Label the finished box as fragile, mark which side should stay upright, and keep it away from heavy items.
When a DIY picture frame moving box makes sense
A framed picture can be awkward to pack. A standard box may leave so much space that the frame shifts as it’s carried. A DIY picture frame moving box is a cardboard enclosure planned around the frame, with padding to cushion it without squeezing it.
Fit and cushioning are the two essentials: size the enclosure around the frame, then add padding to help protect its edges and limit movement. A close fit doesn’t mean tight contact. Leave enough room for cushioning between the frame and the cardboard, but avoid large gaps where the picture can slide.
Whether this approach suits your picture depends on the frame’s condition, size, shape and the materials available. A simple, sturdy frame may be manageable in a carefully made enclosure. Glass, a delicate finish, an unusual shape or existing damage calls for extra care. For background on common frame parts and forms, see Picture Frame Wikipedia.
Check the frame before choosing a DIY approach
Inspect the front, back and edges before measuring. Note whether the frame has glass, a delicate finish, loose fittings or projecting details that could catch on the cardboard. Look for cracks, chips and parts that move. Don’t assume a loose fitting will stay secure during handling. If the piece is particularly valuable or delicate, consider whether a basic homemade box can provide enough protection.
Measure the frame for a close-fitting box
Measure the frame’s outer width and height at the widest and tallest points, including projecting corners or fittings. Then measure its depth, including anything that sticks out at the back. Write down each measurement and label it clearly, so you don’t mix up width, height and depth when planning the panels.
Next, allow room for protective material on the front, back and sides. Plan for the thickness of the padding as well as the frame itself. The amount depends on the material and how it sits, so check the fit as you work. The finished enclosure should cover the edges and keep the padding in place without pressing on the frame.
- Width: record the widest point from outer edge to outer edge.
- Height: measure from the topmost to the bottommost point.
- Depth: include the frame and any fittings that project from the back.
Take extra care with unusual shapes. A deep profile or projecting details may need a different panel layout from a flat rectangle. Accurate notes make it easier to plan the faces and sides, and help prevent an enclosure that is cramped or needlessly roomy.
Choose cardboard and padding for a DIY picture frame moving box
The cardboard forms the enclosure. Padding helps protect the frame and fills space that could let it move. Choose the materials together: the cardboard needs to leave room for cushioning, and padding can’t make weak or damaged cardboard suitable. For a DIY picture frame moving box, base your choice on the frame’s size, condition and the fit you can achieve.
| Material | Packing role | Useful for |
|---|---|---|
| Clean cardboard | Forms the protective faces and sides | Making an enclosure to the frame’s measurements |
| Double-wall cardboard | Provides a stronger cardboard option | A larger or heavier frame where extra support is needed |
| Bubble wrap | Cushions the frame and helps fill small gaps | Adding a padded layer around the frame |
| Paper | Provides cushioning when arranged in even layers | Filling spaces and protecting surfaces from direct contact with cardboard |
Match the cardboard to the frame
Use clean cardboard with enough area to make protective faces for the front and back, plus sides deep enough to enclose the frame and its padding. Check it for weak folds, holes and damp patches before cutting. For a larger or heavier frame, double-wall cardboard can provide a stronger enclosure. The fit and careful handling still matter.
Plan the panels using your measurements, including the space needed for padding. Don’t rely on a box flap or join to protect an edge. Each side should close neatly, without pressing against the glass or a delicate finish.
Plan padding without making the box too tight
Bubble wrap and paper can cushion the frame between its surface and the cardboard. Distribute the material evenly across the front, back and sides, and give the corners extra attention. Add padding to each corner, then check that it stays in place when the frame is settled inside.
Padding should help limit movement, not wedge the frame tightly into the box. Too little can leave room for sliding; too much can put pressure on the glass or frame edges. Close the enclosure gently and check for pressure points. If it bows, bulges or presses against the frame, adjust the padding or panel dimensions before sealing it.
Choose materials to suit the frame’s size and condition, leaving enough room for cushioning to hold it steady without pressure. Phoenix Supplies UK stocks moving boxes and bubble wrap alongside other packing materials. Browse moving boxes and bubble wrap to plan your packing supplies.
DIY picture frame moving box or a suitably sized cardboard box?
A made-to-fit enclosure isn’t always the easiest option. If you have a clean cardboard box that fits the padded frame, using it can save cutting and assembly. A DIY box lets you shape the sides around an unusual frame, provided you can make a secure enclosure from suitable materials. The right choice depends on the frame’s condition, the fit and how securely the box closes.
Compare the options before you start. A standard box with enough room for padding can work well. If the frame slides inside or presses against the box, adjust the packing or choose a different enclosure. A homemade box isn’t automatically safer because it’s made to measure. Loose joins, weak cardboard and flaps that won’t close neatly can leave the frame exposed.
When making a box yourself can work
A DIY enclosure can suit a frame with a manageable shape if you have clean, suitable cardboard and can form protective faces and sides. Decorative details aren’t needed. Focus on accurate measurements, secure joins and edges that close without pushing against the frame. Before packing the picture, check that the panels stay in place and the enclosure holds its shape.
Test the fit before sealing it. If the cardboard bends easily, the edges pull apart or the frame shifts inside, don’t rely on that construction for the move. A homemade box helps organise protection, but it can’t promise damage-free transport.
When a standard box may be simpler
A suitable existing box can be more straightforward when its internal dimensions leave enough room for cushioning and it closes securely. This saves measuring and joining several cardboard panels. Check the inside dimensions, not just the box’s external size. The frame still needs padding, and any spare space needs to be filled so the picture doesn’t move.
If the frame is unusually fragile, valuable or awkwardly shaped, take extra care before choosing either option. Consider the glass, finish and vulnerable fittings, and whether you can keep the padding in place without putting pressure on them.
A simple decision rule: choose the option that fits with cushioning, is in sound condition and closes securely without pressure. If neither meets all three checks, don’t pack the frame in it as it stands. Look at the available cardboard moving boxes and padding, then choose an arrangement you can check properly before moving day.
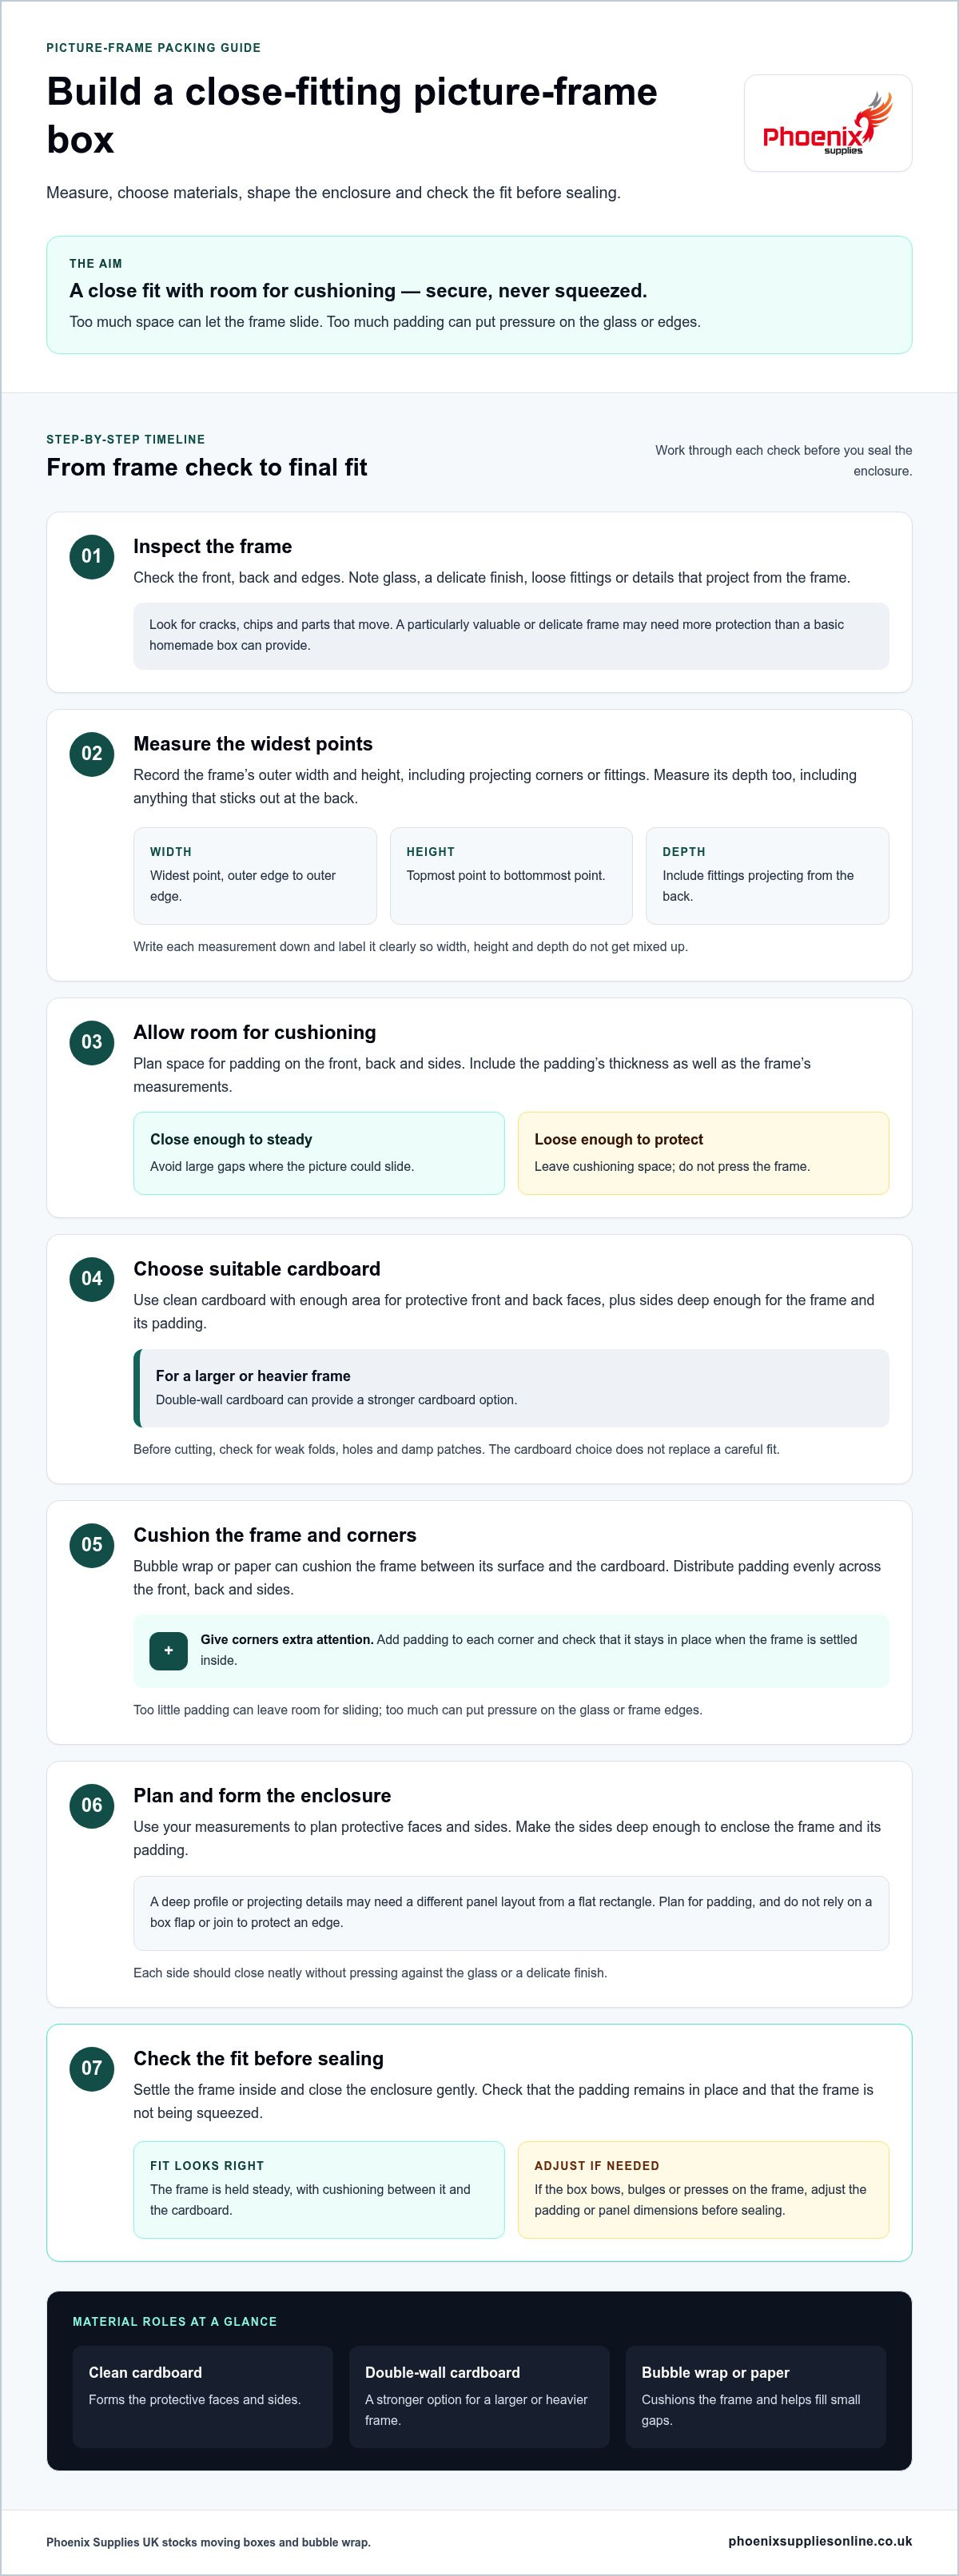
How to make a DIY picture frame moving box step by step
Use your measurements and planned padding allowance to make an enclosure with two protective faces and sides. Work slowly, and dry-fit the cardboard before adding tape. The frame should sit inside without pressure and should not slide freely once padded.
Build order: mark, cut, fold, dry-fit, pad, close and check. Follow the steps in sequence so you can correct the fit before sealing the box.
- Mark the panels. On clean cardboard, mark two face panels large enough to cover the padded frame. Add side strips deep enough to accommodate the frame’s depth and padding. Use your recorded width and height to align the faces, and mark where the sides will fold.
- Cut the cardboard safely. Place it on a stable cutting surface. Use a utility knife carefully, keep your free hand clear of the blade’s path, and cut away from yourself. Make controlled cuts rather than forcing the knife through the cardboard. If the cardboard shifts, stop and reposition it before continuing.
- Fold and dry-fit the enclosure. Fold the marked side strips along a straight edge, then position them around one face panel. Place the second face on top and check that the sides meet cleanly. Test the shape around the frame before taping. Adjust any panel that leaves a large gap or presses against the frame.
- Wrap and pad the frame. Add suitable cushioning around the frame before placing it in the enclosure. Protect each corner separately, and distribute padding across the front, back and edges. Make sure no rough cardboard edge can rub against the frame’s finish or glass.
- Settle the frame in place. Lay the padded frame on the first face and check the sides and corners. Fill any remaining space with cushioning so the frame can’t move freely, but don’t wedge it tightly. The padding should stay in place without pressing hard on the glass or frame edges.
- Close, tape and check. Fit the second face and close the sides. Tape the joins securely on the outside, keeping tape away from the artwork and glass. Gently check whether the frame shifts inside. If the box bulges, won’t close neatly or allows too much movement, reopen it and adjust the fit before moving it.
Take your time at the dry-fit stage. A neat finish matters less than panels that meet securely and an enclosure that closes without pressure. For cardboard and cushioning, browse moving boxes and bubble wrap alongside your other packing materials.
Pack, label and move the finished picture frame box
Once your DIY picture frame moving box is closed, make its handling needs clear before it joins the rest of your moving boxes. A visible label tells anyone handling it to take care. Keeping it upright and away from heavy or awkward items also helps prevent pressure on the frame and damage to the cardboard.
Label and position the packed frame
Write “Fragile” clearly on more than one side, and mark which side should remain upright with an arrow or simple instruction. Place the labels where they won’t be hidden beside other items. Keep the package upright and stable where practical, with its base supported. Don’t stack other boxes on top, even if the enclosure feels firm.
Choose a position where the package is less likely to tip or be knocked as other belongings are moved. Keep it apart from heavy items, furniture and anything with hard edges. If it will travel in a vehicle, position it so it can’t slide or lean against another load. Labels help communicate how to handle the box, but a stable position matters too.
Prepare the frame for moving day
Before carrying the box, check that the taped joins are holding, the cardboard is intact and the flaps remain closed. Listen and feel for loose padding by gently moving the package. If you can feel the frame shifting, open it and adjust the cushioning. Don’t shake the box to test it. Check that no corner or edge has pushed through the cardboard, and keep the package clear of objects that could puncture or press into it.
Keep the frame accessible until it’s ready to be loaded, rather than placing it beneath other belongings. A final check can catch loose tape or a crushed panel before the move is under way. Planning where it will sit with your other packed belongings can also make it easier to reach.
- Label: mark the package as fragile and show which side should stay upright.
- Position: keep it upright and supported where practical.
- Separate: leave it clear of heavy items and anything that could press against or puncture the cardboard.
- Check: make sure the enclosure is closed, intact and free from loose padding.
For your next packing task, browse Phoenix Supplies’ Packaging Materials for moving boxes, bubble wrap and other protective supplies.
Get your moving-day packing ready
Before moving day, check that your packed frame is easy to identify and can be carried without being squeezed between other belongings. Use the same planning approach for other awkward or delicate items: consider what could shift, press against a surface or catch on an edge, then choose packaging that suits the item.
A DIY picture frame moving box is one practical option, and the right materials can make the job easier. Phoenix Supplies is a family-run business established in 1920, supplying cardboard boxes, bubble wrap and other moving materials. The office team can help you choose what to use, with clear communication and helpful customer service.
Get ready for your move at your own pace. Browse Phoenix Supplies’ Packaging Materials to find cardboard boxes and protective materials for your next packing task. With your supplies organised, you can move on to the rest of your preparations.
Frequently Asked Questions
Can I leave the picture inside its frame when moving?
Yes, in most cases you can move the picture and frame as one piece. Keeping the assembled frame together avoids handling the artwork, mount and glazing separately. Before wrapping, check whether anything inside the frame rattles when it’s gently repositioned. If the picture is already loose or the frame is damaged, get advice suited to the item rather than dismantling it as a quick fix.
Should I remove the hanging wire or fittings before packing a picture frame?
Remove or secure hanging wire and fittings that could swing, snag or catch on the wrapping. Put removed screws and hooks in a small labelled bag, then attach it to the outside of the package so the parts stay with the frame without pressing against it. Leave firmly fixed fittings in place if taking them off could damage the frame, and check for sharp ends before packing.
Is it safe to put packing tape directly on picture-frame glass?
No. Instead of taping the pane, add a clean, rigid cardboard panel over the front of the wrapped frame to form a protective face. Keep it supported by the outer wrapping rather than pressing it against the glass. Tape the enclosure around its outside. This adds a layer of protection without putting adhesive on the glass.
Can I use a cardboard tube to move a framed picture?
No, a tube isn’t a good choice for a rigid framed picture. It won’t support the frame across its face, and its round shape can make it roll or put pressure on a small area. Tubes are more suited to items designed to be rolled, such as unframed prints. Keep a framed picture in an enclosure that supports its shape and corners.
How should I pack several picture frames in the same box?
Only group frames that fit inside the box without forcing them into an awkward arrangement. Frames of similar dimensions are easier to organise than a mix of large and small pieces. Give each frame a simple identifier and note it on the outside of the box, or keep a short contents list with your moving inventory. This makes it easier to find the right picture when unpacking.
Can I reuse a homemade picture-frame box for storage?
Yes, provided the box remains clean, dry and in good condition after the move. Before storing the frame, inspect the panels and joins for crushing, tears or damp. Replace the box if it has lost its shape or no longer closes properly. Store it somewhere dry and stable, away from items that might fall against it or put pressure on the package.


